Why Proper AC Refrigerant Line Installation Makes or Breaks Your System
AC refrigerant line installation is the backbone of any functioning air conditioning system – get it wrong, and you’ll face costly compressor failures, voided warranties, and endless repair bills.
Quick Installation Overview:
- Size lines correctly – Calculate proper diameter based on system capacity and refrigerant type
- Route above ground – Never install underground (voids warranty and causes failures)
- Handle copper carefully – Use proper bending tools to prevent kinks and damage
- Braze with nitrogen purge – Prevents internal oxidation that clogs components
- Pressure test thoroughly – Use dry nitrogen to detect any leaks before charging
- Pull deep vacuum – Remove all moisture and air (below 500 microns)
- Insulate suction line – Prevents condensation and maintains efficiency
The lifespan and efficiency of your AC system depends heavily on these copper lines that carry refrigerant between your indoor and outdoor units. As one HVAC technician put it: “The lifespan and function of an AC system rely heavily on good copper pipe installations.”
Why does this matter so much? Because refrigerant lines operate under extreme pressure and temperature conditions. The liquid line can reach temperatures as low as 10-20°F during normal operation, while pressures can exceed 400 PSI. Any installation mistakes – from improper brazing to underground burial – can lead to catastrophic system failure.
Trane and other major manufacturers are crystal clear about this: “With underground piping it is impossible to determine if a compressor failure is a manufacturer’s defect.” Translation? Install lines underground, and you’ve just voided your warranty.

Pre-Installation: Planning, Sizing, and Routing
Proper AC refrigerant line installation requires careful planning before any work begins. We must plan every detail: line sizing based on system capacity, calculating pressure drop, matching the refrigerant type, and ensuring proper oil return to protect the compressor.
This is especially critical for AC Installation for New Homes, where we can design the perfect route from the start.
The key components are the suction line (the larger, insulated line carrying vapor to the compressor) and the liquid line (the smaller line carrying liquid to the indoor unit). Incorrect sizing of either line will cause future problems.
| Installation Method | Risks | Our Recommendation |
|---|---|---|
| Above-Ground Installation | Mainly aesthetic concerns (easily solved with line covers) | Always recommended – maintains warranty, allows easy service access, prevents corrosion |
| Underground Installation | Voids manufacturer warranty, causes compressor failure, corrosion, abrasion, impossible service access, prohibitive repair costs, moisture damage | Strongly discouraged – only consider with sealed vapor-proof chase in extreme cases |
The Underground Debate: Why It’s a Bad Idea
A common question is whether lines can be buried for aesthetic reasons. While we understand the desire to hide the pipes, burying refrigerant lines is a major gamble with your AC system.
Warranty void is the biggest reason to avoid it. If the compressor fails, manufacturers can’t determine the cause with buried lines. They will likely assume it’s an installation issue, voiding your warranty.
Compressor failure is almost inevitable with buried lines. When the system is off, refrigerant can condense in the cold pipes. On startup, this liquid refrigerant rushes back to the compressor, which is designed for vapor, not liquid, causing catastrophic damage.
Underground installation also leads to corrosion from soil, abrasion from shifting earth, and limited service access, making repairs difficult and expensive. Repair costs often include excavation and landscaping restoration.
Moisture damage is another silent killer. Water in the system mixes with oil and refrigerant to create acids that destroy the compressor’s internal components.
The bottom line: there are almost always better alternatives. In rare cases where it’s unavoidable, a sealed, vapor-proof chase is required, but it’s still a risky choice.
For more technical insights on avoiding these pitfalls, check out our HVAC Technical Resources.
Sizing and Sloping for Optimal Oil Return
Once we’ve committed to keeping lines above ground, we focus on calculating line diameter and planning the route. Refrigerant lines act like a circulatory system; the refrigerant must flow at the right speed to carry oil back to the compressor. Too slow, and oil gets left behind; too fast, and pressure drop increases, making the system work harder.
We calculate equivalent length—the actual pipe length plus additions for each fitting (elbows, tees, valves), as each adds flow resistance.
Minimum velocity is crucial for oil return, requiring at least 500 FPM in horizontal runs and 1000 FPM in risers (vertical sections). Without these speeds, oil pools in the lines instead of returning to the compressor. Sometimes we undersize risers by one pipe size to increase velocity and help carry oil up these vertical sections.
Finally, we slope all lines 1/8 inch per foot in the direction of flow. This slight grade uses gravity to help prevent oil traps that can starve the compressor of lubrication.
Getting these details right during planning saves you from headaches later. For more installation insights, visit our Essential HVAC Installation Tips.
The Core Process of AC Refrigerant Line Installation

Now for the hands-on work of AC refrigerant line installation, where planning meets skilled craftsmanship. Every bend, connection, and support is critical, as these copper lines are the lifeline of your AC system. It’s like surgery for your home’s cooling system—precision is key, and there’s no room for cutting corners.
Handling and Bending Soft Copper Lines
Soft copper coils are flexible but must be handled correctly. They come in compact rolls and need to be carefully unrolled and shaped for the installation.
Preventing kinks is job number one. A kinked line is like a clogged artery; it restricts flow and stresses the entire system. When refrigerant can’t flow freely, your compressor works harder, efficiency drops, and you’re looking at premature failure.
Professional pipe benders are our best friends during this process. We never hand-bend copper lines for sharp angles. Instead, we use specialized bending tools like spring benders or hydraulic formers to create smooth, gradual curves that maintain the pipe’s internal diameter and integrity.
Bending springs slip inside the copper tubing to provide internal support during bending, helping ensure consistent, professional results. The key is working slowly and steadily.
Throughout the process, we keep pipe ends sealed. Any debris or moisture that gets inside will circulate through your system and cause serious damage. Cleanliness is absolutely critical.
For insights into what can go wrong when these steps aren’t followed properly, check out our guide on Common Problems with Refrigerant Lines.
Brazing Connections with a Nitrogen Purge

This is a highly technical step where many inexperienced installers fail. Brazing with a nitrogen purge isn’t optional—it’s essential for preventing catastrophic system failure.
When copper is heated to brazing temperatures (over 1100°F) in the presence of oxygen, it creates a black, flaky scale called cupric oxide. This scale will destroy your system from the inside out. It clogs the tiny orifices in your expansion valve and contaminates the compressor oil, creating an abrasive sludge that grinds away at internal components.
The nitrogen purge prevents this disaster. We flow clean, oxygen-free nitrogen through the tubing during brazing. The nitrogen displaces all the oxygen, so there’s nothing for the copper to react with. No oxygen means no oxidation and no scale.
We typically use a 15% silver brazing rod for these connections. The phosphorus in this rod acts as its own flux when joining copper to copper, reducing contamination risk. When we do silver soldering, we use minimal flux to avoid introducing acids into the system.
Every joint gets this treatment—no exceptions. It’s the difference between a system that lasts 15-20 years and one that fails in 3-5 years.
Key Steps for a Proper AC Refrigerant Line Installation
A successful AC refrigerant line installation follows a precise, refined sequence. Each step builds on the last to create a robust, reliable system.
Routing with minimal bends comes first. We plot the shortest, most direct path from the indoor unit to the outdoor condenser. Every unnecessary bend adds pressure drop and potential failure points.
Securing the lines properly prevents future headaches. We fasten the line set every 4-6 feet using appropriate hangers or strapping. We use plastic or copper strapping, or if using metal straps, we protect the copper to prevent galvanic corrosion.
Vibration protection is crucial. We install proper isolators, especially on the outdoor unit, and ensure all supports help dampen movement to prevent stress fractures.
Wall penetrations get sealed completely. We drill holes where lines pass through walls, and after routing, we seal these openings thoroughly with caulking or foam to prevent air leaks, moisture, and pests.
Control wires run alongside the refrigerant lines. This low-voltage wire carries signals between your units. We secure it neatly with the line set and protect it from damage, sometimes using screened communication cable to prevent electrical interference.
Each of these steps might seem small, but together they create a system that works efficiently and reliably. For professional installation services in our area, visit our AC Installation Palm Desert CA page.
Finalizing the System: Testing, Vacuuming, and Insulating

The final steps in AC refrigerant line installation are just as critical as the first. After routing and brazing, the system’s long-term performance depends on pressure testing, pulling a deep vacuum, and insulating. Skipping these steps can lead to system failure.
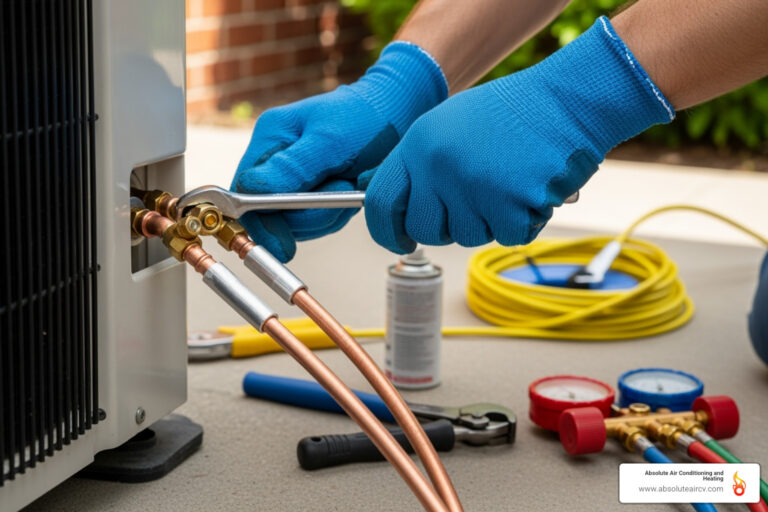
Pressure Testing and Leak Detection
Pressure testing is like a dress rehearsal; we must ensure the new lines can handle operating pressures. We pressurize the system with dry nitrogen (never moisture-filled compressed air) to a level below the unit’s maximum design pressure to avoid damaging components.
We hold this pressure for at least ten minutes, watching our gauges. If the pressure drops, we have a leak. Even if it holds, we apply leak detector soap to every joint and connection, looking for bubbles. For tiny leaks, we use ultrasonic leak detectors that can “hear” escaping gas.
Modern digital gauges make this process much more precise than old analog gauges, allowing us to spot pressure drops that would otherwise be invisible. If you’re experiencing issues with your existing system, check out our guide on Signs You Need AC Repair.
Pulling a Deep Vacuum: The Most Critical Step
The vacuum process is arguably the most critical step. It determines whether your system runs reliably for 15+ years or fails prematurely from internal corrosion.
Removing non-condensables like air is crucial. These gases raise head pressure, forcing the compressor to work harder and consume more energy, which reduces efficiency and lifespan. The real enemy is moisture. Water mixes with refrigerant and oil to create corrosive acids that destroy the system from the inside out, attacking compressor windings and other components.
At a deep vacuum, any remaining moisture boils away at room temperature and gets removed by our vacuum pump. We target 500 microns or lower—about 1/1500th of atmospheric pressure.
Our digital micron gauge is essential here. We watch the numbers drop, which can take an hour or more. We also remove valve cores with specialized tools during this process to improve flow, reinstalling them once the vacuum is complete.
The standing vacuum test is our final check. We isolate the pump and watch for ten minutes. If the vacuum holds below 500 microns, the system is clean and dry. A rise indicates a leak or residual moisture.
An improperly pulled vacuum causes more AC failures than almost anything else. It can even lead to frozen coils – learn more about this on our Why AC Coil Might Freeze Palm Desert page.
Best Practices for Insulating During AC Refrigerant Line Installation
Insulation is not an afterthought; it’s essential for preventing energy waste and condensation damage.
Only the suction line (the larger one) needs insulation. This line carries cold refrigerant vapor (often 40-50°F) back to the outdoor unit. Without insulation, it will attract condensation, dripping water and absorbing heat that kills efficiency. The smaller liquid line stays warm and doesn’t normally need insulation.
We use closed-cell foam insulation because its structure prevents moisture absorption. Open-cell materials like fiberglass are unsuitable as they soak up water.
R-value matters. Higher R-values provide better protection, especially in hot climates like Palm Desert. We also choose insulation with UV protection to withstand the brutal desert sun.
Sealing every seam with electrical or specialized insulation tape is critical. One unsealed gap can let moisture in, leading to sweating lines and potential water damage.
The U.S. Department of Energy provides excellent guidance on insulation principles in their guide to insulation if you want to dive deeper into the science.
Getting these final steps right transforms a basic AC refrigerant line installation into a professional-grade system that will serve you reliably for decades.
Frequently Asked Questions about Refrigerant Line Installation
After helping hundreds of Palm Desert families with their AC refrigerant line installation needs, we’ve heard just about every question you can imagine. Here are the three most important ones that can save you thousands of dollars in repairs and headaches down the road.
Can refrigerant lines be installed underground?
This is probably the question that makes us cringe the most, because we know homeowners are thinking about aesthetics – and we totally get it! Nobody wants ugly copper pipes running along their beautiful home’s exterior. But here’s the tough love truth: underground installation is strongly discouraged by every single manufacturer, and for very good reasons.
Installing refrigerant lines underground creates a perfect storm of problems. You’re looking at premature compressor failure from moisture and debris issues, hidden leaks that turn into expensive treasure hunts, and accelerated corrosion from soil chemicals and groundwater. The real kicker? It will almost certainly void your manufacturer’s warranty because failures can’t be distinguished from installation errors.
Think of it this way – when your expensive compressor fails and the manufacturer sees underground lines, they basically say “we can’t tell if this is our fault or yours, so we’re not covering it.” That’s a costly gamble on a component that can cost thousands to replace.
If underground installation is truly unavoidable (and we mean truly – like in some unique commercial situations), the lines must be run inside a sealed, vapor-proof chase. Even then, you’re taking on significant risk and liability.
Why is purging with nitrogen during brazing so important?
This is one of those technical details that separates professional AC refrigerant line installation from amateur work, and the consequences of skipping it are severe.
When we braze copper joints, we’re heating the metal to over 1100°F. At these extreme temperatures, the copper inside the pipe rapidly oxidizes when it contacts oxygen in the air. This creates a nasty black, flaky scale called cupric oxide – think of it like rust, but worse for your AC system.
Here’s where it gets scary: this scale doesn’t just sit there looking ugly. It breaks free and travels through your refrigerant system like tiny pieces of sandpaper. These flakes can clog the small orifices in your expansion valve (TXV), causing your system to malfunction. Even worse, they contaminate the compressor oil, turning it into an abrasive sludge that literally grinds your compressor to death from the inside.
Flowing nitrogen during brazing is our insurance policy. The nitrogen displaces all the oxygen inside the pipes, preventing oxidation completely. It’s like creating a protective bubble around the inside of your copper lines while we work. This simple step can mean the difference between a system that lasts 15+ years and one that fails catastrophically in just a few seasons.
What happens if you don’t pull a deep enough vacuum (below 500 microns)?
This question hits at the heart of why proper AC refrigerant line installation requires specialized knowledge and equipment. An improper vacuum is honestly one of the leading causes of premature AC failure, and the damage it causes is both invisible and devastating.
When we don’t pull a deep enough vacuum, we’re leaving behind moisture and air – two things that are absolutely toxic to your AC system. Here’s what happens to each:
Moisture is like poison to your system. It mixes with the refrigerant and compressor oil to form corrosive acids that literally eat away at the compressor windings and other metal components. Imagine pouring battery acid into your car’s engine – that’s essentially what’s happening inside your AC system when moisture is present.
Air acts as a non-condensable gas that doesn’t belong in the refrigerant cycle. It raises the head pressure, forcing your compressor to work much harder than it was designed to. Think of it like trying to breathe through a straw – your heart has to work overtime, and eventually, it gives out from the strain.
The industry standard is below 500 microns for good reason. At this level, any remaining moisture will actually boil away at room temperature and get removed by our vacuum pump. We typically target 200-300 microns to give you that extra margin of safety your family deserves.
The bottom line? Cutting corners on the vacuum process is like building a house on a weak foundation – it might look fine at first, but it’s going to come crashing down when you least expect it.
Conclusion
Getting your AC refrigerant line installation right isn’t just about following a checklist – it’s about understanding that every bend, every joint, and every step directly impacts your family’s comfort for years to come.
Think about it this way: your AC system is only as strong as its weakest link. You could have the most expensive, energy-efficient unit on the market, but if those copper lines weren’t installed with proper technique and specialized tools, you’re setting yourself up for frustration, costly repairs, and premature system failure.
The technical skill required for proper installation goes far beyond what most people realize. From calculating precise line sizing to pulling that critical deep vacuum below 500 microns, each step requires EPA certification and years of hands-on experience. There’s simply no shortcut to doing it right.
At Absolute Air Conditioning & Heating, we’ve seen too many systems fail prematurely because corners were cut during installation. That’s why our factory-trained technicians take the time to do every step correctly – from the nitrogen purge during brazing to the meticulous pressure testing that ensures system longevity and peak efficiency.
When you invest in professional installation, you’re not just buying a service – you’re buying peace of mind. You’re ensuring that your system will deliver consistent comfort while keeping those energy bills reasonable. Most importantly, you’re protecting your investment with proper techniques that manufacturers actually warranty.
Your home deserves the reliability that comes from precise engineering and careful craftsmanship. For expert HVAC services in Palm Springs, CA, and surrounding areas, trust our certified technicians to get the job done right. Because when it comes to your family’s comfort, there’s no room for compromise.