
Unlock Comfort: Your Guide to Mini Split AC Installation
Why Mini Split AC Installation is the Smart Choice for Modern Homes
Mini split AC installation provides an energy-efficient, flexible heating and cooling solution without extensive ductwork. These systems can significantly reduce energy bills by providing precise temperature control for individual rooms or zones.
Key benefits of mini split systems include:
- Energy efficiency: Inverter-driven compressors adjust speed based on demand.
- Zoned comfort: Control temperature in specific rooms independently.
- No ductwork required: Ideal for older homes or new additions.
- Quiet operation: Indoor units operate at very low noise levels.
- Year-round comfort: Provides both heating and cooling.
- Quick installation: Often completed in a few hours to a weekend.
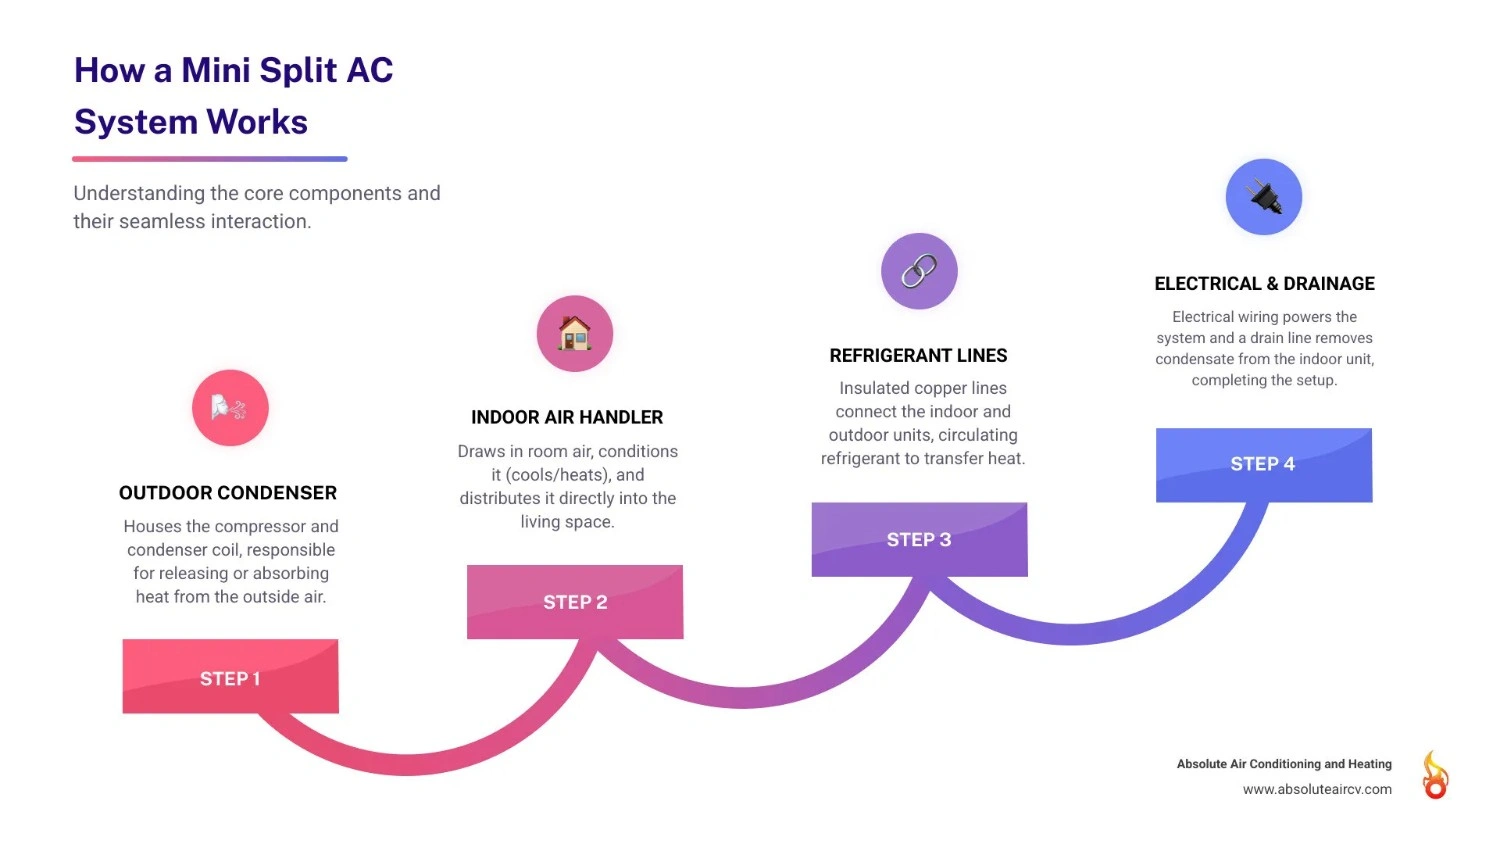
Mini split systems connect an outdoor condenser to one or more indoor air handlers via refrigerant lines. The indoor units distribute conditioned air directly into living spaces, eliminating energy losses from traditional ductwork.
Understanding the installation process—which involves mounting units, connecting refrigerant lines, and making electrical connections—is key to making informed decisions for your home's comfort.
Pre-Installation Planning: Sizing, Tools, and Location
Proper planning is the foundation for a successful mini split AC installation. Key considerations include sizing, system type, and electrical needs.

Sizing Calculations: A correctly sized mini split is crucial. Sizing is measured in BTUs (British Thermal Units). Factors include room size, ceiling height, insulation, and window exposure. A south-facing room needs more cooling power than a shaded one. While manufacturers provide sizing charts, consulting a professional ensures accuracy.
Single-Zone vs. Multi-Zone Systems: Single-zone systems cool one area with one indoor and one outdoor unit. Multi-zone systems connect multiple indoor units to a single outdoor condenser for independent temperature control in different rooms.
FeatureSingle-Zone SystemsMulti-Zone SystemsCoverageOne room or defined areaMultiple rooms or zonesIndoor UnitsOneTwo or more (up to 8, depending on model)Outdoor UnitsOneOneControlIndividual temperature control for one areaIndependent temperature control for each indoor unitIdeal ForRoom additions, garages, small apartmentsWhole homes, larger spaces with varied needsEnergy SavingsEfficient for the specific zoneImproved through zone control, conditioning only needed areas
Electrical Requirements: Mini splits require a dedicated circuit of either 120V or 240V, depending on the unit. Always check the manufacturer's specifications. A qualified electrician should verify that your home's electrical system can safely handle the load.
For detailed guidance on selecting the right system for your specific needs, check out our comprehensive guide on how to Choose the Best Mini Split AC.
Choosing the Right Location
Proper location is critical for your mini split AC installation.
Indoor Unit Placement:
- Mount the air handler at least six feet high on a wall for optimal air circulation. An exterior wall simplifies connections.
- Avoid direct sunlight and heat sources (lamps, electronics) that can confuse temperature sensors.
- Choose a central location for even temperature distribution, leaving clearance for airflow and maintenance.
- Use a stud finder to locate solid mounting points. Use high-quality drywall anchors if studs are not available.
Outdoor Unit Placement:
- Ensure 12-24 inches of clearance on all sides for proper airflow to prevent inefficiency.
- Place the unit on a level, stable surface like a concrete pad or a sturdy wall bracket.
- Consider noise and place the unit away from bedrooms and patios.
Lineset and Drainage:
- When drilling the lineset hole, angle it slightly downward to the outside to ensure proper condensate drainage and prevent water issues.
Essential Tools and Materials for a Mini Split AC Installation
Gathering all necessary tools and materials beforehand ensures a smooth mini split AC installation.
Essential Tools:
- Drill with a 3-3.5 inch hole saw for the lineset opening.
- Level to ensure both units are mounted correctly for proper drainage.
- Wrenches, including a torque wrench for precise refrigerant line connections.
- Wire strippers and screwdrivers for electrical work.
- Specialized Tools: A vacuum pump and micron gauge are critical for removing air and moisture from refrigerant lines, ensuring system efficiency.
Required Materials:
- Mounting brackets for both indoor and outdoor units.
- Condenser pad or wall bracket for a stable outdoor unit base.
- Lineset covers to protect and conceal lines.
- Sealant and caulk to weatherproof the wall penetration.
- Electrical wiring that meets manufacturer specifications.
The Step-by-Step Mini Split AC Installation Process
This section outlines the core steps of a mini split AC installation. While the process may seem complex, breaking it down makes it manageable.
Safety First: Before starting, always turn off power to your work area. Wear safety glasses and gloves. Your manufacturer's manual is your most important guide; always follow its specific instructions. The steps below are a general guide.
For a visual walkthrough, How to Install a Mini-Split Air Conditioner offers helpful insights.
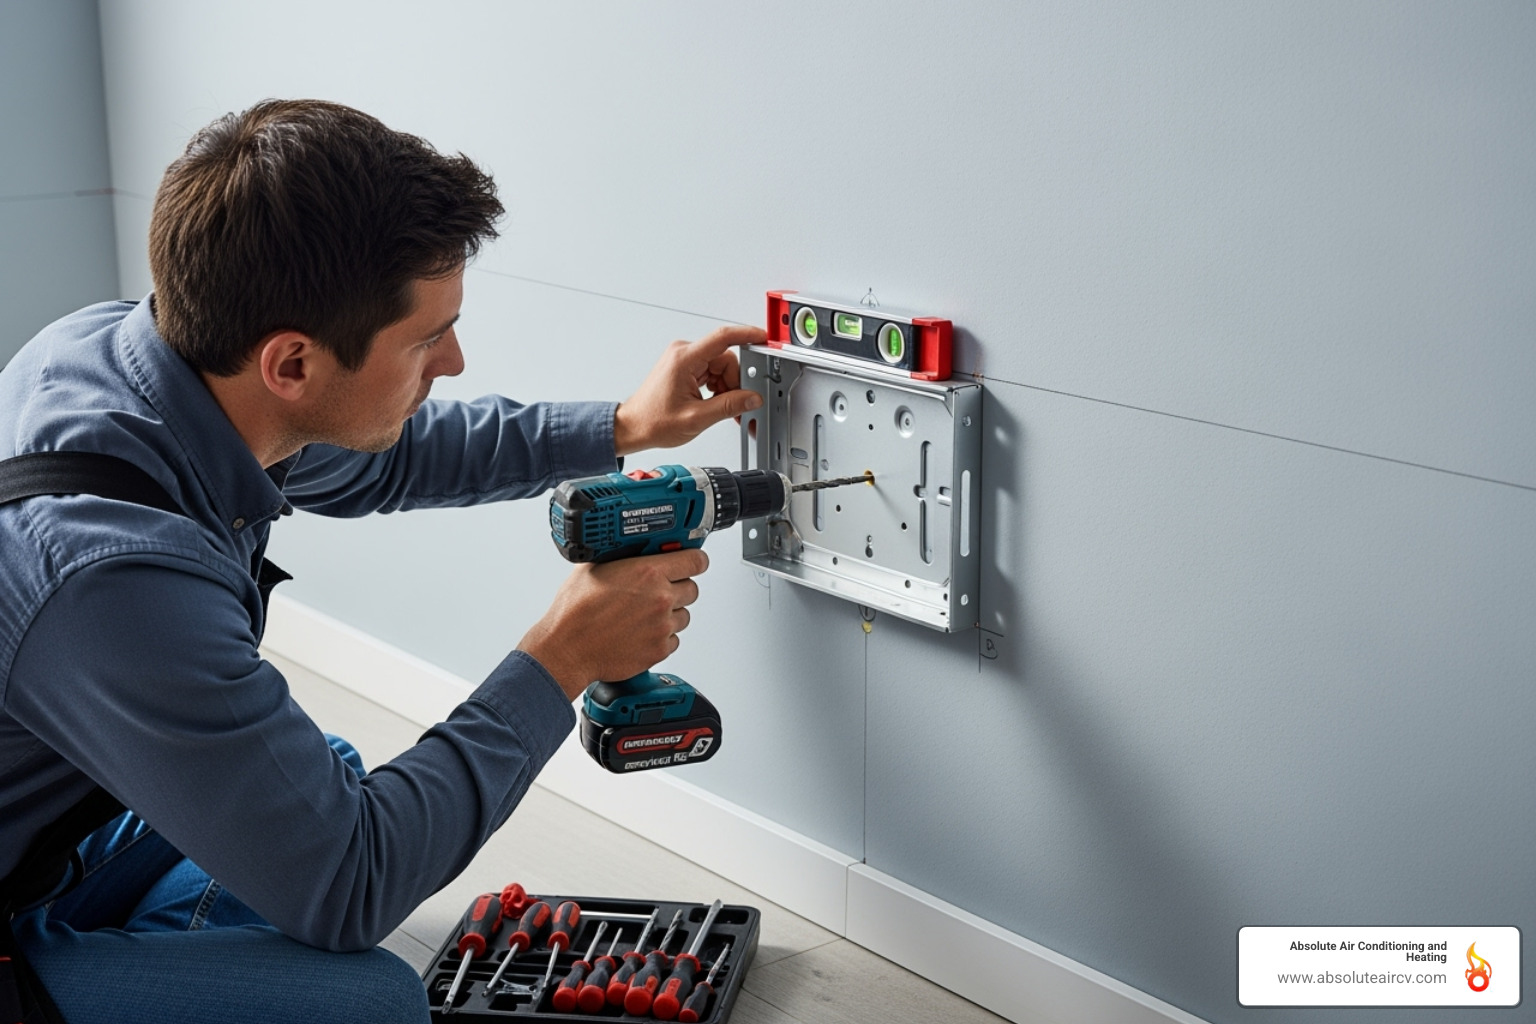
Step 1: Mounting the Indoor Air Handler
Correctly mounting the indoor unit is the first major step.
- Secure the Mounting Plate: Use the provided template to mark and drill holes. Locate wall studs for a secure installation; if studs aren't available, use heavy-duty hollow wall anchors rated for the unit's weight.
- Ensure the Bracket is Level: A level bracket is critical for proper condensate drainage. Use a level to verify its position before securing it.
- Drill the Lineset Hole: Use a 3.5-inch hole saw to drill from the inside out. Angle the hole slightly downward toward the outside to ensure proper drainage.
- Feed Lines Through the Wall: Carefully bundle the refrigerant lines, control wire, and drain line. Gently guide the bundle through the hole, avoiding kinks or damage.
- Hang the Indoor Unit: Lift the unit and hook it securely onto the mounting plate. Ensure it locks into place.
Step 2: Mounting the Outdoor Condenser
The outdoor unit requires a solid, level foundation for long-term performance.
- Prepare the Base: Place the condenser on a stable, level base. A concrete or high-quality plastic pad protects the unit from ground moisture and debris. Alternatively, use a sturdy wall mounting bracket, especially in areas with heavy snow.
- Secure the Outdoor Unit: Position the unit on the pad or bracket and secure it according to the manufacturer's instructions. Ensuring level placement is crucial for proper operation.
- Install Vibration Pads: Place rubber pads under the unit's feet to reduce operational noise and vibration.
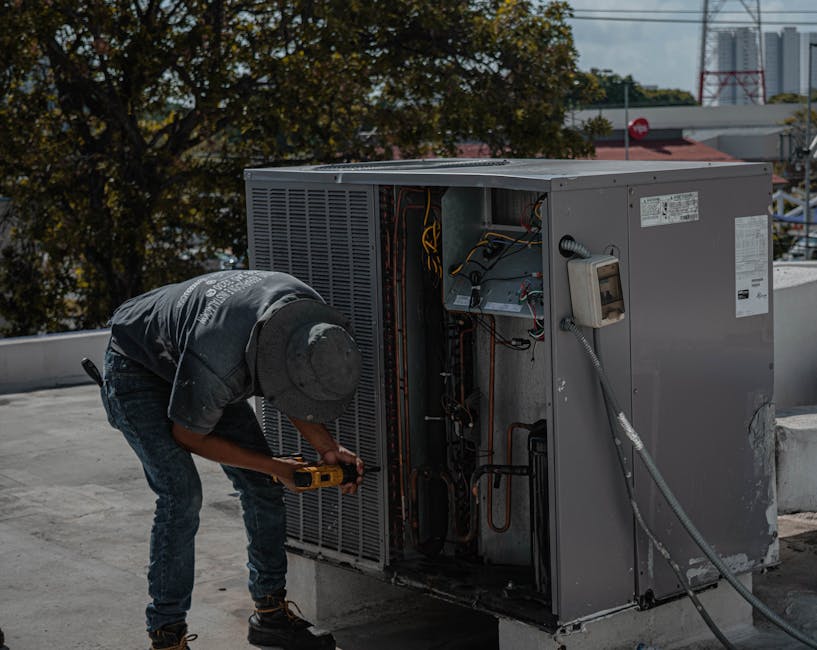
Step 3: Connecting the Lines
Precision is key in this step to prevent future issues.
- Connect Refrigerant Lines: Hand-thread the connections first to avoid cross-threading. Then, use a torque wrench to tighten them to the exact specifications in your manual. This prevents leaks and damage. Never cut pre-charged lines.
- Connect the Drain Line: Ensure the drain line maintains a consistent downward slope away from the house to prevent water from pooling and causing clogs.
- Run the Electrical Control Wire: Follow the wiring diagram precisely to connect the indoor and outdoor units. This low-voltage wire enables communication between the components.
- Insulate and Cover Lines: Insulate all refrigerant lines to prevent energy loss and condensation. Install a lineset cover on the exterior wall for a professional finish and to protect the lines from weather and damage.
For insights into how your newly installed system can provide customized comfort throughout your home, explore our guide on Zone Control with Ductless AC.
DIY vs. Professional Installation: Making the Right Choice
Deciding between a DIY or professional mini split AC installation involves weighing cost savings against potential risks. While DIY can seem appealing, it's important to understand the complexities involved.
While professional installation adds to the project cost, it comes with responsibilities and risks that DIYers must assume. To get the full benefits of a mini-split system, such as energy efficiency and quiet operation, a proper installation is key. Learn more about these advantages on our Benefits of Ductless ACs page. The main question is how to achieve a flawless installation while avoiding costly errors.
The Case for Professional Mini Split AC Installation
Professional mini split AC installation offers significant advantages that ensure long-term performance and reliability.
- Guaranteed Workmanship: Factory-trained technicians have the specialized knowledge to install systems correctly, preventing common issues.
- Proper Tools and Experience: Professionals use high-quality, specialized tools like vacuum pumps, micron gauges, and torque wrenches that are essential for a proper installation.
- Code Compliance: Professionals ensure the installation meets all local building codes and permit requirements, keeping your home safe and compliant.
- System Longevity and Warranty: Proper installation is key to a system's 15-20 year lifespan and is often required to maintain the manufacturer's warranty.
- Refrigerant Handling Expertise: EPA-certified technicians handle refrigerants safely and responsibly, protecting both you and the environment.
- Peace of Mind: Hiring a professional ensures your investment is protected and your system will operate reliably for years.
Potential Challenges of a DIY Mini Split AC Installation
Despite the appeal of cost savings, DIY installation presents significant challenges that can lead to costly mistakes.
- Refrigerant Leaks: Improperly flared or tightened connections are a common DIY error, leading to slow leaks that reduce efficiency and harm the environment.
- Vacuuming and Charging Lines: This is a highly technical step. Failing to properly evacuate air and moisture from the lines with a vacuum pump and micron gauge can destroy the compressor.
- Electrical Mistakes: While connecting low-voltage wires may be simple, high-voltage work requires a licensed electrician. Errors can lead to fire, system damage, or injury.
- Voiding the Manufacturer's Warranty: Many manufacturers require professional installation to honor their warranty, meaning DIY savings can be lost if a repair is needed.
- Safety Risks: Working at heights to install units carries inherent safety risks.
Given the specialized knowledge, tools, and potential for costly errors, professional installation is often the smarter long-term investment.
Post-Installation: Sealing, Testing, and Maintenance
After the main mini split AC installation is complete, the final steps involve sealing, testing, and understanding maintenance to ensure years of efficient operation. This final attention to detail is critical for performance.
If your system isn't cooling properly after installation, issues in this final stage are often the cause. For troubleshooting help, visit our page on Ductless AC Not Cooling Properly.
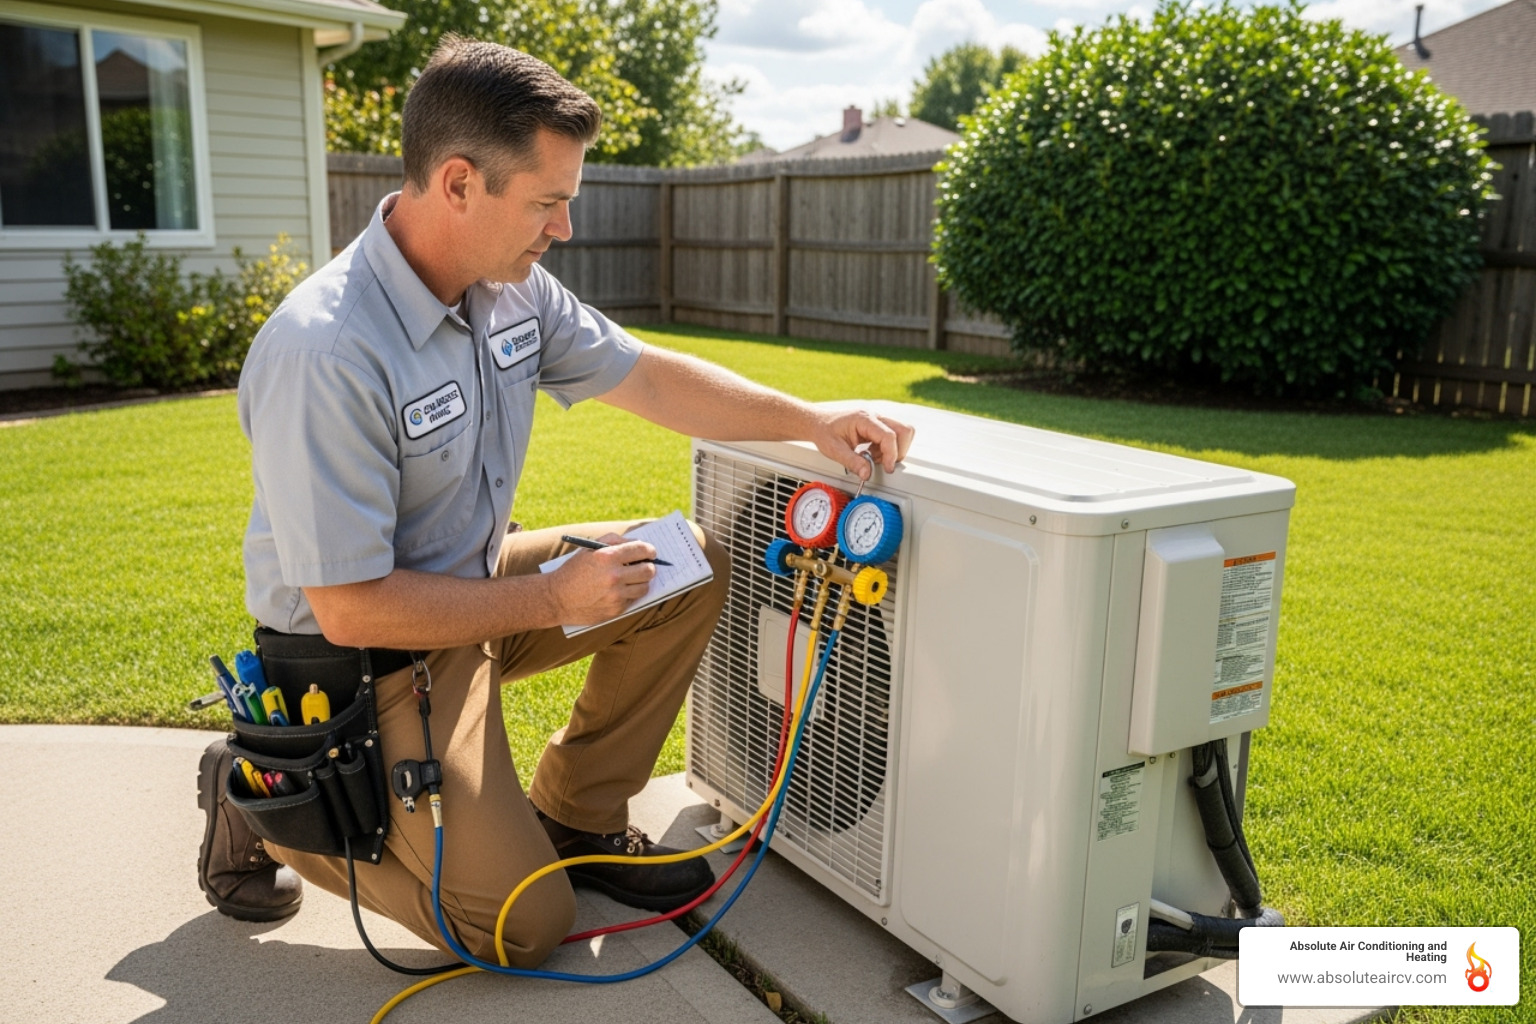
System Sealing and Testing
A final check ensures the system is sealed and operating correctly.
- Seal the Wall Penetration: Weatherproof the exterior lineset hole with caulk and sealant, then attach the lineset cover. This prevents drafts, moisture, and pests.
- Check for Leaks: Apply a soapy water solution to all refrigerant connections. Bubbles indicate a leak that must be fixed.
- Perform a Vacuum and Decay Test: This is a critical step for non-pre-charged systems. Use a vacuum pump and micron gauge to evacuate all air and moisture from the lines to prevent compressor damage. A deep vacuum (below 500 microns) should be pulled and held to confirm there are no leaks.
- Release Refrigerant: Once the vacuum test is successful, open the valves on the outdoor unit to release refrigerant into the system.
- Verify Proper Operation: Turn on the power and test both heating and cooling modes. Ensure proper airflow, remote control function, and listen for any unusual noises.
- Clean Up: Remove all tools, packaging, and debris from the work area.
Long-Term Mini Split Maintenance
Regular maintenance is key to keeping your system running efficiently after your mini split AC installation is complete.
- Clean Indoor Unit Filters: Clean or replace filters monthly during peak seasons. Dirty filters restrict airflow, reduce efficiency, and worsen air quality.
- Keep the Outdoor Unit Clear: Regularly remove leaves, grass, and debris from around the outdoor condenser to ensure proper airflow. Gently rinse the coils with a garden hose as needed.
- Check the Drain Line: Periodically inspect the condensate drain line for clogs to prevent water backup and potential leaks.
- Schedule Annual Professional Service: An annual tune-up by a certified technician is the best way to ensure system longevity. Professionals check refrigerant levels, electrical connections, and clean components to identify potential issues before they become major repairs.
Proactive maintenance ensures your system remains efficient and reliable. For more on how dirt affects performance, see our page on Dust and Debris Impact on Ductless AC.
Frequently Asked Questions about Mini Split Installation
Here are answers to some of the most common questions about mini split AC installation.
How much can I save with a DIY mini split installation?
Homeowners can potentially save a significant amount on labor costs by performing a DIY mini split AC installation. Labor can be a large part of the total project cost, and some DIYers report completing the work for a fraction of professional quotes.
However, it's important to weigh these potential savings against the benefits of professional installation, which include warranty coverage, guaranteed workmanship, and the peace of mind that the job is done correctly. This security is often worth the investment.
Do I need a permit to install a mini split AC?
Permit requirements vary by location. Most areas require an electrical permit for the new dedicated circuit to ensure the work meets safety codes. Some jurisdictions may also require an HVAC permit, especially for work involving refrigerants.
Always check with your local building department before starting your project to understand the specific rules in your municipality and avoid compliance issues.
How long does it take to install a mini split?
A mini split AC installation is typically much faster than a traditional ducted system installation.
An experienced DIYer can often install a single-zone system in a weekend, especially with DIY-friendly units featuring pre-charged lines. A professional can usually complete a single-zone installation in just a few hours. Multi-zone systems will take longer.
The total time depends on factors like wall construction and the distance between units, but it remains a quicker process than installing ductwork.
Conclusion
A mini split AC installation is a smart investment in your home's comfort and efficiency. These ductless systems offer impressive energy savings, whisper-quiet operation, and precise temperature control.
This guide has covered the key steps, from planning and sizing to the final connections. A well-executed installation is the foundation of years of reliable comfort, preventing issues like poor performance or premature system failure. A proper installation ensures you enjoy lower energy bills and consistent temperatures.
The choice between DIY and professional installation depends on your technical skill, access to specialized tools, and comfort with warranty risks. The complexities of refrigerant handling, electrical work, and system testing often require professional expertise.
For homeowners in Palm Desert and the Coachella Valley, partnering with Absolute Air Conditioning and Heating removes the guesswork from your mini split AC installation. As a local, family-owned business, we bring factory-trained expertise to every job, ensuring your system is sized, installed, and tested for optimal performance in our unique desert climate.
Our skilled technicians handle all the technical details, so you can simply enjoy the comfort of your new system.
Ready to experience the perfect blend of comfort and efficiency? Let's make it happen together.
Contact us for your mini split air conditioner needs in Palm Desert, CA
Serving the Entire Coachella Valley

.webp)
Beat the Heat: Same-Day & 24-Hour AC Repair Services Near You
Facing an AC emergency in Indian Wells? Get fast, reliable 24 hour AC repair Indian Wells services to restore your cool and safety now.

Palm Desert's Best Air Duct Cleaners: A Fresh Air Guide
Breathe cleaner air! Learn why air duct maintenance in Palm Desert is essential for health, energy savings, and a dust-free home.
Palm Springs AC Installation: How to Choose the Best Service for Your Home
Need air conditioner installation Palm Springs? Learn to choose the best AC system & professional installer for desert comfort & efficiency.
