

Anatomy of an Attic AC Unit: Understanding the Diagram Before You Call for Service
Hearing Noises or Spotting Leaks from Above?
That sudden drip from the ceiling or an unusual rattling noise overhead is never a welcome discovery, but it makes grasping the anatomy of an attic AC unit: understanding the diagram before you call for service an essential first step. When a problem strikes, your first instinct might be to grab a flashlight, push open the attic hatch, and try to figure out what is going wrong. However, looking into a dark, cramped space filled with a maze of silver tubes, metal boxes, and wiring can feel incredibly overwhelming.
During the crucial September fall-prep season, our team at Absolute Air Conditioning and Heating frequently helps Palm Desert homeowners who notice strange symptoms as their systems transition from handling heavy summer cooling to preparing for cooler weather. Having a basic mental map of the equipment hidden above your ceiling helps you safely observe the issue without attempting dangerous DIY repairs. Knowing the right terminology ensures you can accurately describe the problem when scheduling professional help, saving time and preventing minor issues from escalating into major water damage.
If you are already dealing with an active leak or a system that refuses to run, securing professional air conditioning services is the best way to protect your home and restore your comfort.
The Big Picture: Mapping Your Attic HVAC Layout
Before diving into the individual components, it helps to understand how the entire system is laid out. In our years of servicing local homes, we've found that most residential setups with overhead ductwork utilize a horizontal attic split-system air handler. Unlike the upright units you might see in a garage or basement closet, an attic system is laid on its side to maximize limited vertical space under the roofline.
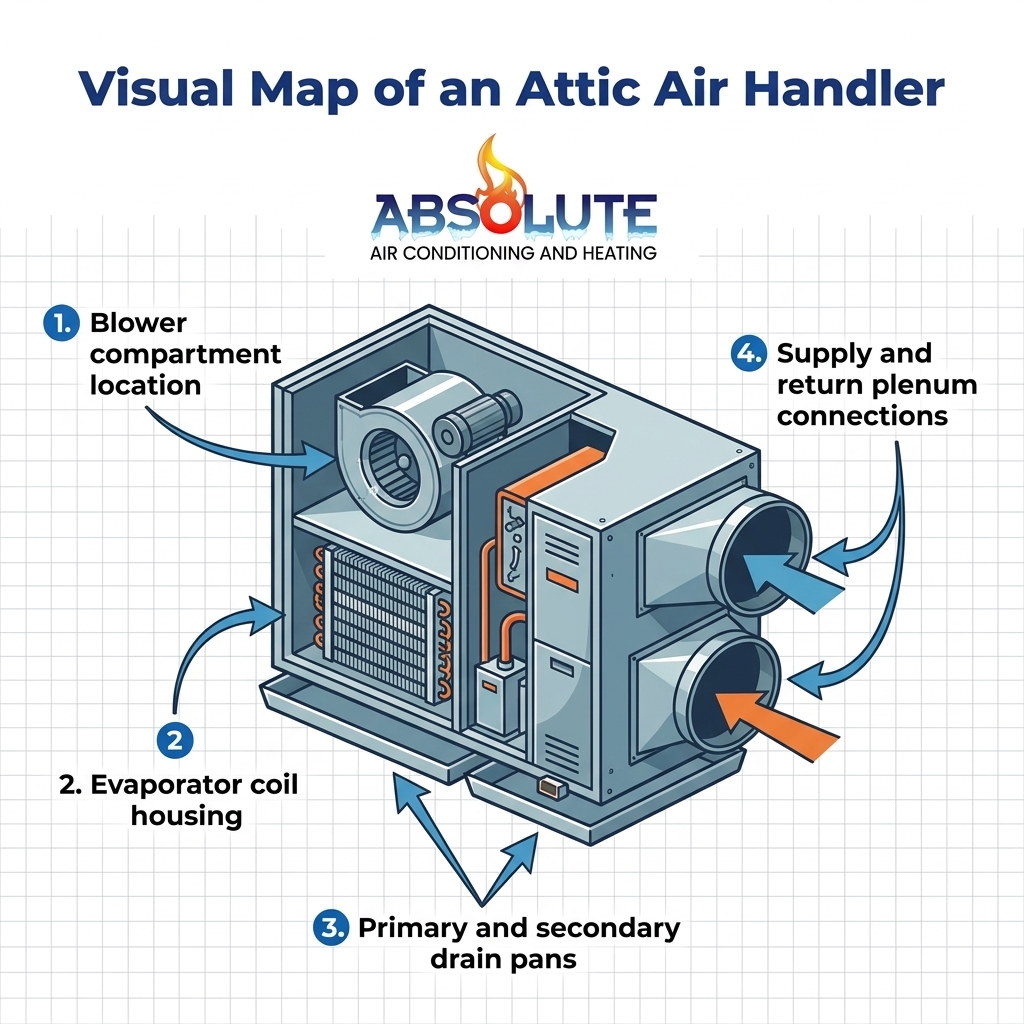
When you look through the attic access point, the layout generally follows a straight path. The central hub is the main metal cabinet, which houses the active components responsible for conditioning and circulating the air. Connected to both ends of this central hub are large, insulated tubes or boxes. These are your supply and return ductwork systems, acting as the lungs of your home.
Visual Identification Guide
To help translate a technical diagram into a practical mental map, here is what you are actually looking at from the safety of your attic stairs:
• Large, rectangular metal cabinet in the center — Technical Component Name: Air Handler Unit (AHU) — Primary Function: Houses the blower motor and evaporator coil to treat and move air.
• Thick, insulated silver tubes connecting to the box — Technical Component Name: Flexible Ductwork — Primary Function: Carries air to and from the rooms in your house.
• Metal or plastic tray sitting flat beneath the entire unit — Technical Component Name: Secondary Drain Pan — Primary Function: Catches overflow water to protect your ceiling from leaks.
• White PVC pipes exiting the metal cabinet — Technical Component Name: Condensate Drain Lines — Primary Function: Carries normal moisture away from the system and out of the house.
Remember, your goal is observation, not intervention. Navigating an attic requires stepping only on reinforced joists, and a single misstep can send a foot straight through the drywall ceiling below. Always observe from a secured walkway or the hatch itself. For a deeper dive into how these systems are initially placed in such tight spaces, reviewing a comprehensive guide to attic AC systems can provide valuable context.
The Air Handler Cabinet and Blower Compartment
The largest piece of equipment in your attic is the air handler cabinet. Inside this metal housing sits the blower compartment, which acts as the mechanical heart of your climate control system. Whether you are heating or cooling your Palm Desert CA home, the blower motor is responsible for pulling stale air from your rooms and pushing conditioned air back through the vents.
Because the blower contains a heavy-duty motor, a spinning fan wheel, and high-voltage electrical connections, it is heavily secured behind a metal access panel. You should never attempt to open this panel yourself, as the spinning components and electrical hazards pose serious safety risks. However, because the blower is a moving mechanical part, it is often the source of unusual sounds.
Translating Noises for the Dispatcher
If you hear strange sounds coming through the ceiling, listening closely can help you describe the symptom to a technician:
• Squealing or screeching: This high-pitched noise usually indicates a failing belt (in older models) or worn-out bearings in the blower motor.
• Grinding or scraping: A harsh metal-on-metal sound often means the blower wheel has come loose from its mount and is scraping against the metal housing.
• Thumping or banging: A rhythmic thumping can point to debris caught in the blower wheel or an unbalanced fan blade that needs immediate calibration.
• Weak airflow with a hum: If you hear the system humming but barely any air is coming out of your vents, the motor may be struggling to start due to a failed electrical capacitor.
By pinpointing the type of noise and noting that it originates from the main cabinet, you give our repair team a massive head start on diagnosing the issue before we even pull into your driveway.
The Evaporator Coil and Plenum Boxes
Adjacent to the blower compartment inside the main cabinet is the evaporator coil. In a horizontal attic split-system air handler, this coil is typically shaped like an "A" or a "N" and is packed with highly pressurized refrigerant lines. The evaporator coil is the exact location where the actual cooling takes place. As the blower pushes warm indoor air over the freezing cold metal fins of the coil, heat and humidity are extracted from the air.
Because the refrigerant inside these lines is under intense pressure and requires specialized licensing to handle, the coil housing must remain sealed. However, you can visually inspect the exterior of the cabinet. If you notice a thick layer of white frost or solid ice forming on the outside of the metal box, or on the copper pipes leading into it, you have a frozen coil. This is a critical issue that requires you to turn the system off immediately at the thermostat to prevent the compressor from burning out.
Understanding the Plenums
Attached to the ends of the air handler are the plenums. Think of plenums as the grand central stations for your home's airflow.
• The Return Plenum: This box connects to the ductwork that pulls warm, stale air from inside your house up into the attic.
• The Supply Plenum: Located on the opposite end, this box receives the newly cooled (or heated) air from the air handler and distributes it into the various supply ducts leading to your bedrooms and living areas.
If you notice that a plenum box looks crushed, heavily dented, or completely detached from the main cabinet, the system will struggle to move air properly, leading to massive efficiency losses and uneven temperatures throughout the house.
Primary and Secondary Condensate Drain Pans
Perhaps the most critical components for a homeowner to identify during September fall-prep are the condensate drain pans. As the evaporator coil removes humidity from the air, that moisture turns into condensation. This water drips off the coil and into the primary drain pan, which is hidden inside the metal cabinet. From there, it flows out through a white PVC pipe to the exterior of your home.
However, drain lines frequently clog with dust, algae, and debris over a long season of heavy use. When the primary line clogs, the internal pan overflows. That is why your attic unit sits inside a much larger, shallow metal or plastic tray called the secondary drain pan.
The Impact of Extreme Attic Heat
With extreme summer temperatures often exceeding 130°F in a closed attic, the materials housing your HVAC system endure incredible thermal stress. This constant baking heat accelerates wear on plastic secondary drain pans, making them brittle and highly prone to cracking by the time fall arrives. If the primary line clogs and the secondary pan is cracked, water will bypass the safety mechanisms and soak directly into your ceiling drywall.
Seeing standing water, rust, or water stains in that large lower tray is a giant red flag. It means the primary system has failed and the backup system is actively catching water. For example, our technicians recently helped a local homeowner during a seasonal transition for a yearly inspection of their AC and furnace. Because they scheduled prompt maintenance, our team was able to perform a thorough inspection, clear the drain lines, and verify the integrity of the pans before a leak could damage their home. The service was so valuable that the customer signed up for a yearly maintenance package on the spot.
Regular upkeep is the only proven way to prevent these pans from overflowing. Scheduling routine AC maintenance ensures a professional clears the lines and tests the safety switches before water damage occurs.
Ductwork Connections and Mastic Seals
Once the air is conditioned, it has to travel from the metal plenums through the flexible ductwork to reach your living spaces. The connection points where these soft ducts meet the hard metal boxes are critical zones for efficiency.
To keep these joints airtight, installers use mastic sealant—a thick, paste-like material that hardens over the seams, often reinforced with specialized foil tape. When you are looking at your system from the attic hatch, pay close attention to these connection points.
Spotting Leaks and Degraded Seals
In regions like Palm Desert CA, our repair team frequently sees how intense attic thermal stress causes rapid expansion and contraction of the duct materials. Over several seasons, this constant shifting can cause the mastic sealant to dry out, crack, and peel away.
If the sealant fails or a duct collar slips off the plenum, your system will literally blow ice-cold (or heated) air directly into the unconditioned attic space instead of your bedroom. You might notice:
• Sections of foil tape hanging loose from the duct joints.
• Crumbly, grey paste falling away from the metal collars.
• A noticeable breeze or temperature drop while standing near the attic hatch while the system is running.
Spotting these gaps early allows a professional to restore the system's efficiency quickly. Re-sealing ductwork is a highly effective way to lower utility bills and improve airflow, making it a common priority during professional AC service visits.
Safely Observing Without Risking Damage
The ultimate goal of understanding a horizontal attic split-system air handler is not to fix it yourself, but to become an informed observer. Transparent education empowers homeowners to communicate confidently, leading to faster, more accurate diagnostics from the service team.
When you spot an issue, observation should only happen from a safe distance, such as the top of the attic stairs. Do not attempt to walk across unfloored joists, and never remove metal panels or touch electrical wiring.
What to Note for the Dispatcher
When you call for service, having precise information ensures the technician arrives with the right tools and replacement parts. Before you pick up the phone, make a quick mental checklist:
• Location of water: Is the water dripping from a white pipe, or is it pooling in the large secondary pan underneath the entire unit?
• Type of noise: Are you hearing a squeal from the blower compartment, or a rattle from the ductwork?
• Visual indicators: Do you see ice on the copper lines, or peeled tape on the duct connections?
The golden rule of attic HVAC observation: If you detect a major water leak, see ice forming on the equipment, or smell burning electrical components, stop observing and immediately turn the system off at the thermostat.
Providing this level of detail yields real results. For example, we recently assisted a homeowner dealing with a stressful breakdown during the intense heat. Because they clearly communicated the system's symptoms to our dispatch team, our technicians arrived fully prepared with the right parts, providing an honest, reliable diagnosis that resolved the issue quickly and safely. Clear information always leads to better service outcomes.
Frequently Asked Questions About Attic AC Components
What is the HVAC unit in the attic called?
The main indoor unit located in your attic is called an air handler. In most residential setups, it is a horizontal attic split-system air handler, meaning it is laid on its side to fit under the roofline. This cabinet contains the blower motor and the evaporator coil, working in tandem with the condenser unit located outside your home.
Why is there water in my attic AC drain pan?
Standing water in the large secondary drain pan beneath your unit indicates that the primary condensate drain line is clogged. When the main line backs up with dirt or algae, water overflows into this backup pan. If you see water here during September fall-prep, it is a critical warning sign to call a technician before the pan overflows and damages your ceiling.
Where is the evaporator coil on an attic air handler?
The evaporator coil is housed inside the main metal cabinet of the air handler, usually positioned just ahead of the blower motor. You cannot see the coil itself without removing an access panel, but you can identify its location by looking for the thick, insulated copper refrigerant lines entering the side of the metal box.
Does the attic AC unit have a filter?
While some attic units have a filter slot built directly into the return plenum box, most modern residential systems place the air filters inside the return grilles located in the ceilings or walls of your living space. It is much safer and easier to change filters from inside the house rather than climbing into the attic every month.
How can I safely check my attic AC unit for leaks?
You can safely check for leaks by standing on the secure attic stairs or hatch platform with a strong flashlight. Shine the light on the large secondary drain pan underneath the unit to check for standing water, and inspect the white PVC pipes for active drips. Never step on bare drywall or attempt to open the metal cabinet yourself.
Empowering Your Next Service Call
Understanding the basic anatomy of the unit sitting above your ceiling removes the guesswork and anxiety when problems arise. You don't need to be an engineer to know the difference between a blower compartment, an evaporator coil, and a secondary drain pan. You just need a practical mental map.
Remember that clear communication leads to quicker, more effective service. When you can accurately describe a rattling noise near the return plenum or standing water in the secondary pan, your technician arrives prepared to solve the exact problem at hand.
If you have noticed any unusual leaks, strange noises, or weak airflow coming from your attic system, don't wait for the issue to escalate into a costly ceiling repair. Reach out to our local experts for AC repair in Palm Desert CA to address the symptoms safely and keep your home comfortable all season long.
Serving the Entire Coachella Valley


Addressing the Musty Smell from Your Attic Air Handler After Summer Humidity
That sudden dirty socks odor from your vents isn't just a nuisance—it is a sign of biological growth. Find out if it is a simple filter fix or a job for a pro.

Why We Recommend Scheduling Your Pre-Heating Tune-Up Before the October Rush
Waiting for the first cold snap to test your furnace often leads to long service delays. Take a behind-the-scenes look at how local HVAC supply chains operate in the fall.

Evaluating the Switch from a Traditional Attic AC to a Heat Pump System This Fall
If your aging air conditioner barely survived the summer, you face a crucial choice before winter. See why a unified heat pump offers better year-round efficiency than standard gas combos.

